
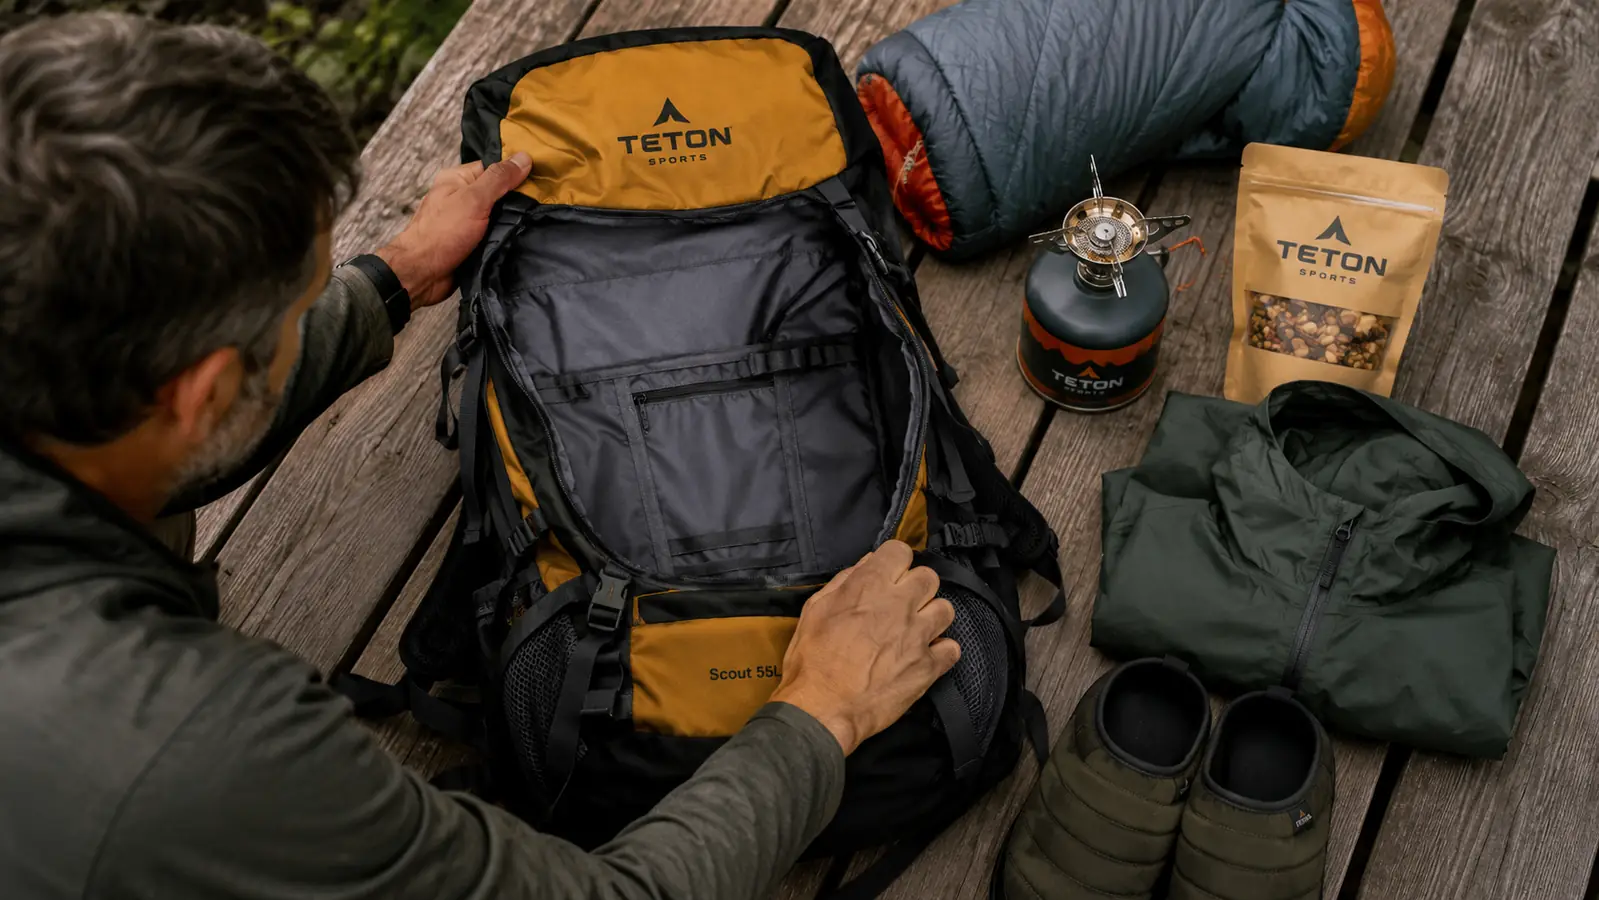
I have repacked the same bag four times at 10pm the night before a trip. Every time, the problem was not having too much gear. It was not knowing where anything went or why. You shove the sleeping bag in last, the food sits wrong against your spine, and by mile three you are already dreading camp. The TETON Sports Scout 55L is the pack I reach for on two-to-three night camping weekends, and after a season of hunting camps and trail trips with it, I have worked out a packing sequence that goes in right the first time and stays balanced on the trail.
This is not a packing theory article. This is the exact order I use, the zones I load into, and the gear list that fits a 55L frame without overflow. If you have been wrestling with a pack that tips you sideways or leaves critical items buried when you need them at camp, this is the fix.
The pack that makes this system work: TETON Sports Scout 55L
Rated 4.7 stars across 7,900+ verified buyers. Internal frame, adjustable torso, separate sleeping bag compartment, and a side hydration sleeve. Under $100 and sized right for a weekend camping load.
Amazon Check Today's Price on Amazon →Before You Pack: The Three-Zone Rule
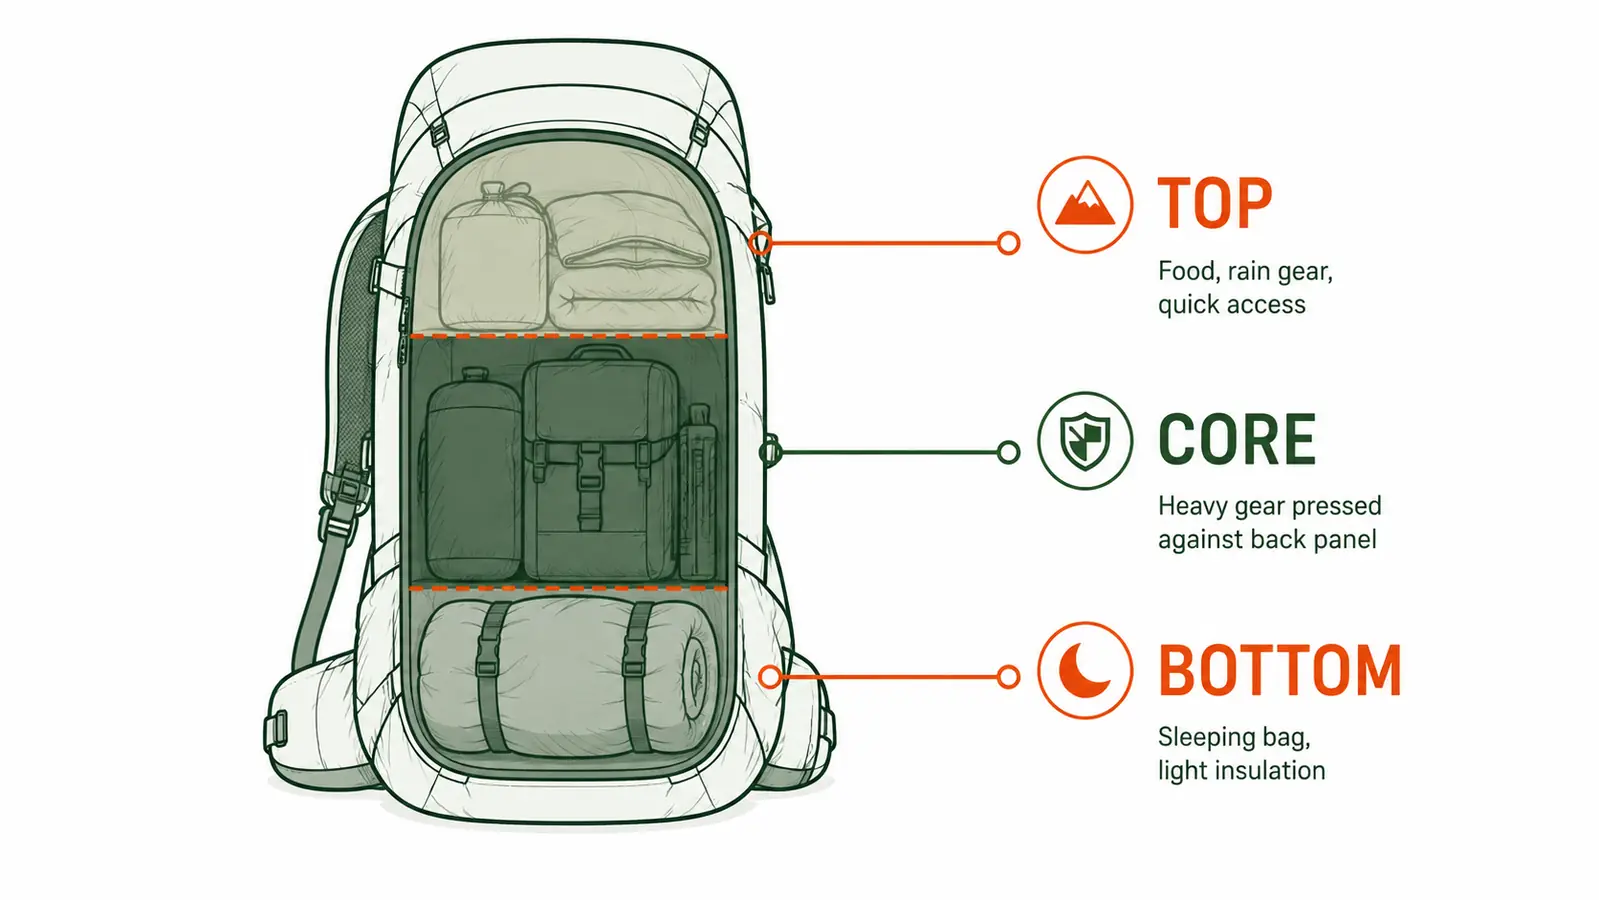
Every internal frame pack has three functional zones, whether the manufacturer labels them or not. Bottom zone is for light, bulky gear you will not need until you make camp. Core zone, against the frame and your back, is where the heavy stuff goes. Top zone and hip belt pockets are for the things you reach for on the trail without stopping. If you load these zones wrong, you will feel it in your lower back by the second mile.
The TETON Scout 55L makes this easy because it has a separate bottom compartment that zips off from the main bag, specifically designed for a sleeping bag. That natural separation takes the guesswork out of the bottom zone. The main compartment does the rest, and the two hip belt pockets plus top lid pocket handle your trail-accessible gear. Know those zones before you pull anything off the pile, and the rest of this goes fast.
Step 1: Bottom Zone -- Sleeping System and Camp Shoes
Start with the dedicated bottom compartment. Roll your sleeping bag tight, compress it into its stuff sack, and drop it in first. It is the lightest high-volume item you own, and it belongs at the bottom so it does not throw off your center of gravity. If you carry a sleeping pad that does not strap to the outside, compress it and tuck it around the sleeping bag. Camp shoes or sandals go in here too, one on each side of the bag to fill dead space.
For a two-night weekend trip in three-season temps, I run a synthetic fill bag rated to 32 degrees. It compresses to roughly the size of a football. If you are camping in late fall or at elevation, size up the temperature rating, but also plan for the extra bulk in this compartment. The TETON Scout bottom zip compartment handles bags in the 20-to-35 degree synthetic range without issue. Down bags compress smaller and give you more room.
Close the divider zipper between the bottom and main compartments when you are done with this zone. Keeping it shut prevents everything from consolidating into one giant pile when you lay the pack down at camp.
Step 2: Core Zone -- Heavy and Dense Items Against the Frame
This is where most campers get it wrong. Heavy items need to ride against the frame, as close to your back as possible and centered vertically between your shoulder blades and the top of the hip belt. When weight rides high and close, it transfers through the frame to the hip belt instead of pulling your shoulders back and grinding your lower back. When it rides low or away from the frame, you are fighting the pack all day.
For a weekend camping trip, heavy items typically include: water filter and water (carry water in a reservoir positioned flat against the back panel inside the main compartment), camp stove and fuel canister, cook pot, food bear canister or bear bag with food inside, and your tools or repair kit if you carry one. Pack them into the main compartment snug against the frame padding. Use clothing to fill gaps and prevent shifting.
The TETON Scout 55L has a foam-padded frame sheet and an internal aluminum stay that you can shape slightly to match your spine curve. Most people never bother. Spend two minutes bending the stay to fit your back, and the pack will feel like it disappears on a loaded trail. It is one of the underrated features of this pack at its price point. See the full rundown in the Teton Scout 55L long-term review.
Step 3: Mid Zone -- Clothing, Layers, and Camp Kitchen
Above the heavy core items, fill in with your clothing and the rest of your camp kitchen setup. Clothing bags, dry sacks, and a compression sack for your puffy jacket all pack well in this zone because they conform to the remaining space. Lay them flat in horizontal layers rather than stuffing them vertically. Each layer acts as a shelf for the next one and prevents the contents from settling.
For a two-night summer-to-fall trip, my clothing list is: two base layer tops, one mid layer fleece or hooded sweatshirt, one wind or rain shell, two pairs of hiking socks, one pair of camp socks, a buff, and a light hat. Everything goes into a single 10-liter dry sack so I can pull the whole clothes stack without digging. That dry sack becomes a pillow at night.
Camp kitchen in this zone: a single-wall titanium or stainless cup nested inside your cook pot, a folding spork, coffee kit in a small zip pouch, and any spice/condiment pack. The stove and fuel canister should already be in the core zone below. The cook kit here is just the eating hardware, which weighs almost nothing.
When heavy items ride close to the frame and centered vertically, you feel the pack less at mile eight than you did at mile one. Get this wrong and it does not matter how good the pack is.
Step 4: Top of Main Compartment -- Food and Rain Gear
Food and your rain shell go at the very top of the main compartment, just below the top lid. Food is accessible here when you stop for a snack break without having to dig through the pack. Your rain shell needs to come out fast when weather moves in, and weather moves in fast in the mountains. I keep mine rolled into itself and sitting right on top, loose, not strapped into anything.
If you are not using a hard-sided bear canister and are instead using an Ursack or food bag with a throw rope, pack the rope on top of the food bag so it is accessible at your first camp. Nothing worse than arriving at site after dark and having to dump the pack to find the hang rope.
The lid pocket of the TETON Scout 55L is a full zippered pouch. I use it for my headlamp, a folded map or printed permits, lip balm, sunscreen, and a small first aid kit. The lid comes off the pack entirely with a clip system, which is useful if you want to use it as a small summit day pack on layover days. Not a feature you see at this price point very often.
Step 5: External Pockets and Lash Points -- Trail-Access Gear Only
The TETON Scout 55L has two stretch-mesh side pockets, two hip belt pockets, and external lash straps on the front panel. Each of these is for trail-access gear only. Nothing goes in the external pockets that you would not want to reach without taking the pack off.
Side pockets: water bottle on one side, trekking pole when you are not using it on the other. Hip belt pockets: snacks, knife, a small compass, and your phone. Front lash panel: trekking poles when both hands are busy, a wet rain jacket after the storm passes, or a foam sit pad. I sometimes lash my packable rain pants here in dry weather so they are off my hip belt and not adding bulk.
One note on the TETON Scout side pockets: they are sized for a standard 32oz Nalgene or a 1-liter SmartWater bottle, but they are not tight enough to hold a bottle reliably on rough terrain without a small bungee cord or a tight stretch. I carry a compact water filter like a Sawyer Squeeze and fill a 1-liter soft flask, which stays put better than a rigid bottle. On longer days, I run a 2-liter hydration reservoir inside the main compartment instead and skip the side bottles entirely.
For a full breakdown of the Scout's pockets, shoulder strap harness, and field durability, see the honest field review of the Teton Scout 55L.
What Else Helps
The packing order is the biggest factor, but a few other things affect how the load feels and how organized you stay over a multi-day trip.
Color-coded dry sacks make a real difference. I use three colors: green for clothing, orange for food, and grey for electronics and first aid. When I open the main compartment at camp in the dark, I grab by color and do not have to think. This also speeds up the repack on day two, when you are tired and not thinking clearly.
Weight matters more than volume on a 55L pack. If your total loaded weight is over 30 lbs, the TETON Scout will carry it, but you will feel every pound past 25 by the end of a big day. Before every trip I weigh the loaded pack and cut anything non-essential if I am over 28 lbs. A kitchen scale at home takes ten seconds and saves your knees on the trail.
The TETON Scout 55L is sized right for a two-to-three night weekend trip in most conditions. It is not a five-day pack and it is not a summit pack. If you start pushing four nights or more, you will feel the volume limit. For weekend camping and hunting base camp use, though, it fits the mission. And at the price, if it wears out in a few seasons of hard use, you have not lost much. See how it compares in the breakdown of why internal frame packs beat daypacks for multi-night camping.
The TETON Scout 55L is the pack this system is built around
4.7 stars, 7,900+ reviews, separate sleeping bag compartment, aluminum stay frame you can shape to your back, and detachable lid pocket. It is the right size for a camping weekend and priced low enough that it is not a gamble.
Amazon Check Today's Price on Amazon →